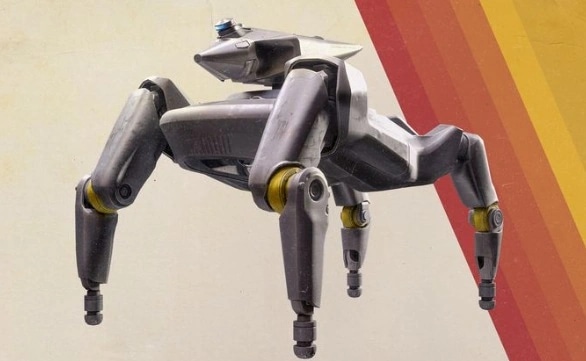
The Bully is a four-legged ARC machine that patrols Pendola Pass. It can attack from range and close the gap with a charge, so a solo fight works best when you have solid cover, room to dodge and enough supplies to stay in the encounter.
Aim for the yellow joints on its legs, fire during openings and move sideways when it charges. If you need a Bully Fragmenter for a quest or upgrade, leave enough inventory space and raid time to collect it and extract.
Where to Find a Bully in ARC Raiders
Search for a Bully around these locations on Pendola Pass:
- Railroad Junction
- Both sides of Commissary Supermarket
- The area east of the Fallen Emperor
Bullies patrol, so use these as search areas rather than guaranteed spawn points. Scan nearby roads and structures before opening fire.
Look for a building, train or other substantial obstacle with space to move around it. Pick a second piece of cover nearby so you have somewhere to go if an explosive lands close to your position. Elevated ground can offer a clear view of the legs, provided you have a safe route down.
Bully Weak Points and Attacks
The Bully’s yellow knee joints are its most accessible weak points. Wait until the machine turns, recovers from a charge or pauses, then take controlled shots at an exposed joint.
Its head is another target. The outer housing needs to be damaged before the area underneath is easier to hit. Keep watching the machine even after damaging a component; the fight is over only when the Bully is destroyed.
| Attack | How to respond |
|---|---|
| Explosives | Move away from the impact area and shift to another piece of cover. |
| Close-range shotgun | Create distance and move around an obstacle before reloading. |
| Charge | Dodge sideways as the Bully commits, then use its turn or recovery to reposition. |
Avoid spending a full magazine while standing in the open. Short firing windows give you more time to react and make accurate shots on the joints.
How to Solo a Bully
A successful solo attempt starts with the right position. Before the fight, check your ammunition, identify an escape route and clear nearby smaller threats if you can do so without drawing the Bully toward you.
- Set up behind solid cover. Keep a second position within reach.
- Shoot an exposed knee joint. Return to cover after a short burst.
- Watch for the charge. Dodge sideways, then shoot or reposition while the Bully turns.
- Reload and heal when protected. Move to your backup cover if the current position becomes unsafe.
- Check the surroundings after the kill. Look and listen for other Raiders before searching the wreck.
- Collect the item you need and extract. Leave enough time to reach an exit safely.
If your objective asks only for 300 damage, check the tracker once you have dealt it. You may be able to leave without committing to a full kill. If the task names a body part or requires a Fragmenter, plan around that requirement before engaging.
Best Solo Bully Loadouts
Your weapon choice should leave room for ammunition, healing and a shield. A heavy weapon can shorten the fight, while a budget loadout lets you practice the encounter with equipment that is easier to replace.
| Loadout | Suggested use | Preparation |
|---|---|---|
| Ferro or Rattler | Budget attempts and controlled weak-point fire | Carry spare ammunition and wait for clear joint shots. |
| Hullcracker | Deliberate heavy shots against weak points | Bring enough ammunition and use cover between attacks. |
| Amplified Hullcracker with Mag Reload | Players who want quicker reloads during a longer fight | Keep repair resources available for the amplified weapon. |
A Showstopper can create an opening to attack while the Bully is stalled. Whatever weapon you bring, reserve some ammunition for smaller ARC and other Raiders on the route to extraction.
Bully Fragmenter and Quest Objectives
The Bully Fragmenter is an Epic item associated with the Bully and is used for progression, including the Level 3 Research Station. After a kill, inspect the main wreck and any separated parts, then check that the Fragmenter is in your inventory before leaving.
Apollo’s Bait, Fetch, Blast quest includes Bully-related objectives and a Fragmenter hand-in. Read the active step before firing: a damage requirement, a body-part objective and an item hand-in each call for a different approach.
Keep a free inventory slot for the item you need. Once you have it, check the area and choose a covered route to extraction.
Preparing Your Items for Pendola Pass
Organize your ARC Raiders Items around the objective before deploying. Put your chosen weapon, spare ammunition, shield and healing supplies in the loadout, and leave space for loot if you are hunting a Fragmenter.
If you are considering ARC Raiders Items for sale, plan around the full expedition rather than a weapon alone. A loadout with enough ammunition and recovery supplies gives you more flexibility during the fight and on the way to extraction.